This tutorial was put together by Colin Adams (CT-25622), OddViking on social media and the 501st Clone Trooper Detachment forums.
The primary difference between this Imperial Surplus version and other makers is that Kevin went with the more accurate small neck ring size, which requires a modification to wear it (either a back-off or face-off mod). See this video I made of the finished helmet, showing what that means:
First off, just like all cast items which usually have some sort of mold-release spray to aid in removing from the mold, you will need to first wash the helmet in warm soapy water. The residue resists paint and glue, and doing this simple step first will usually help painting down the line.
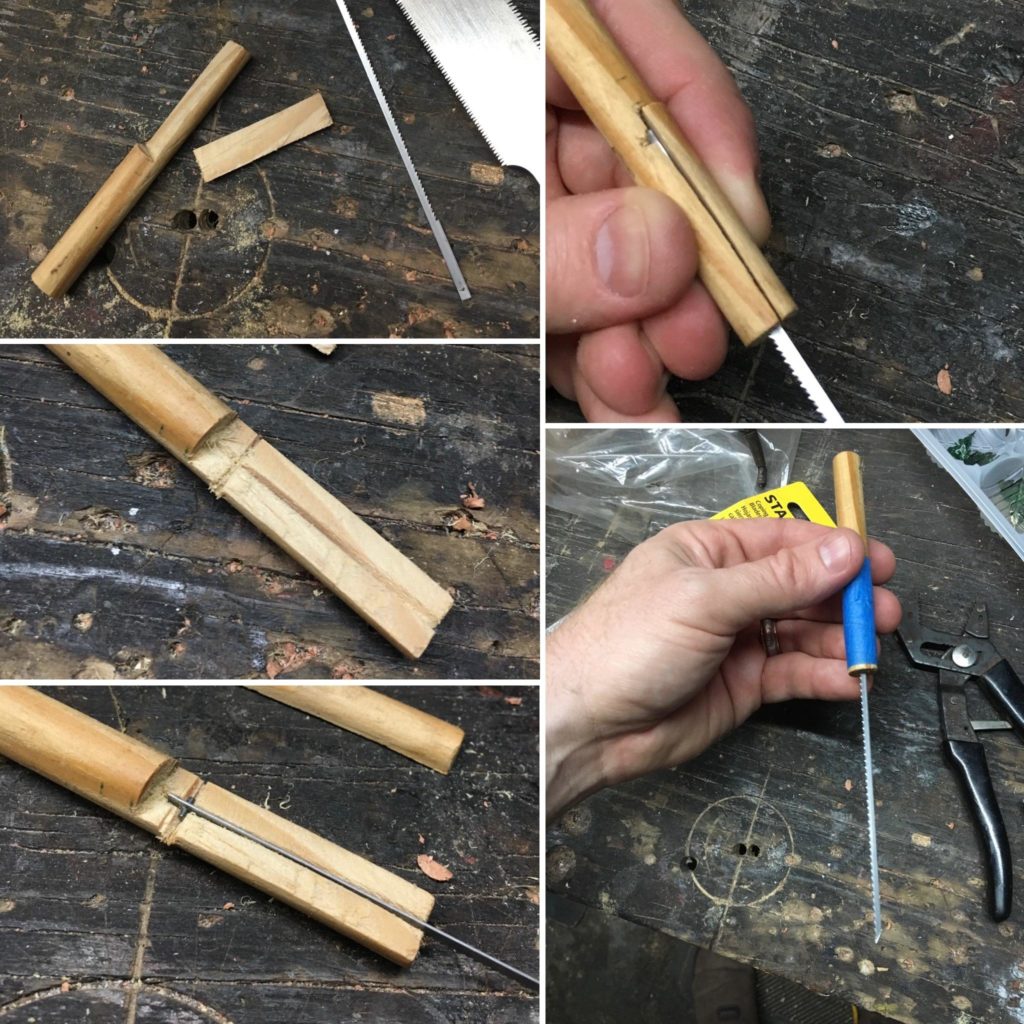
I have had quite a few questions about what tools I used to cut the tricky face-off cut, and why I chose face-off rather than the easier back-off. For tools, a few years back I came up with a simple tool using a fine toothed coping saw blade, inserted into a handle. I did a majority of cuts using this (I also used it for the visor cut out). It is simply a length of dowel, with a piece cut out at about the half-way line, effectively removing 1/4 of the dowel, done with a thin flexible Japanese saw. I then cut a slot for the blade, and a cross-slot for the pins, and then taped it closed. I trimmed the other end off to a point. It is about a ten minute project to build it, and this little saw allows you to insert it into a drill hole, or come in from an edge, and make slow, controlled cuts with a tight turn radius:
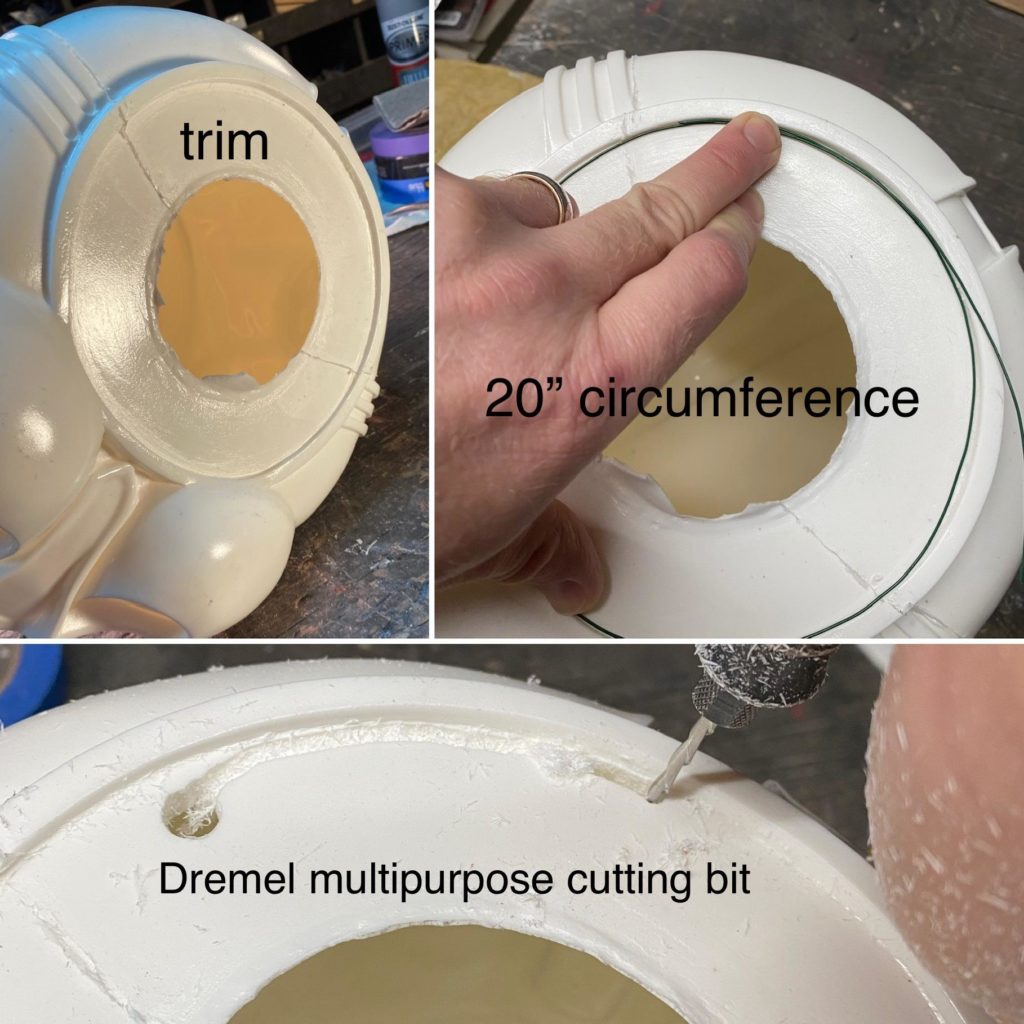
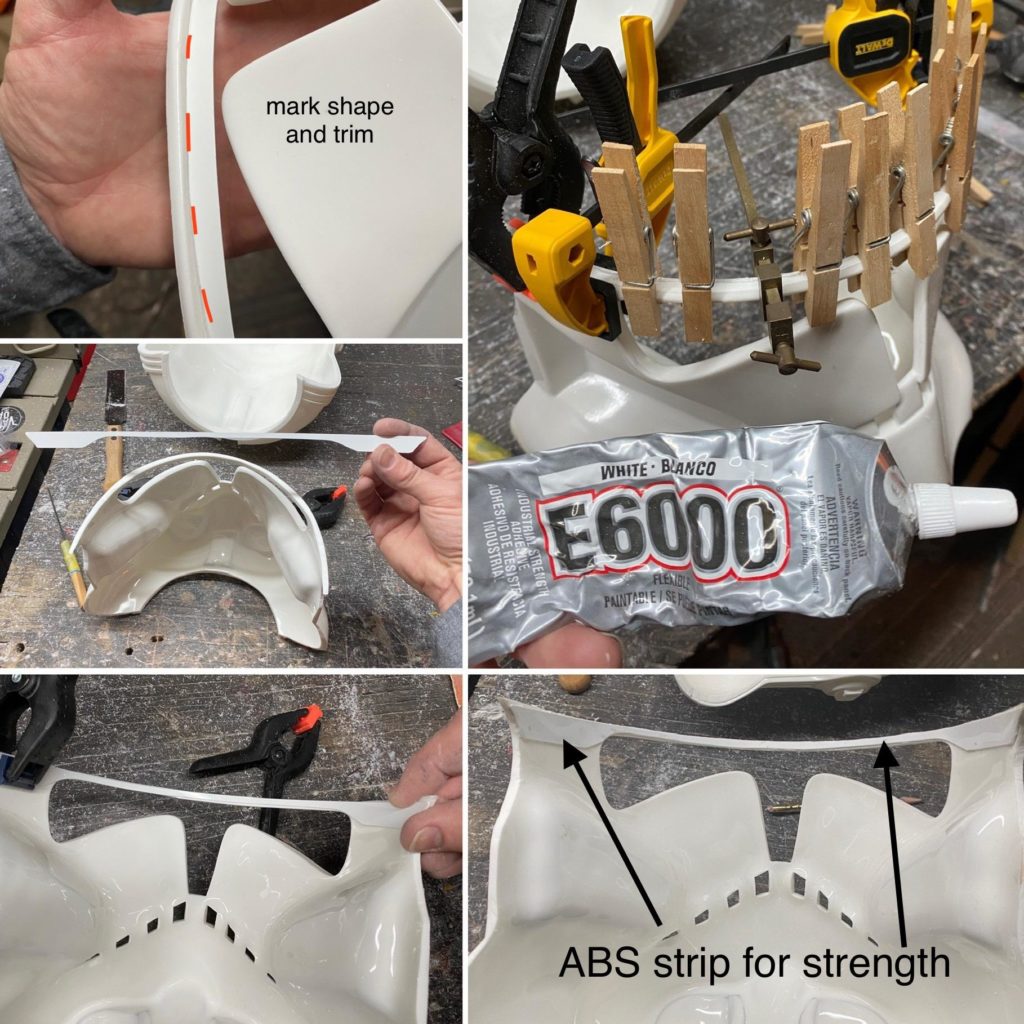
To start with, the cast has a sort of filled in neck hole, so that will need to be removed. I simply drilled a larger hole, and used a Dremel multipurpose cutting bit to go around the edge, leaving a little room. Once it is cut, the inner edge is easily cleaned up with a Dremel sanding drum bit. Also shown here is where I measured, and got a 20″ circumference. My head is 23.5″ circumference at the brow, so you can see why a mod is needed if you want to wear it. If it is only for display, you can happily skip the next few difficult steps.
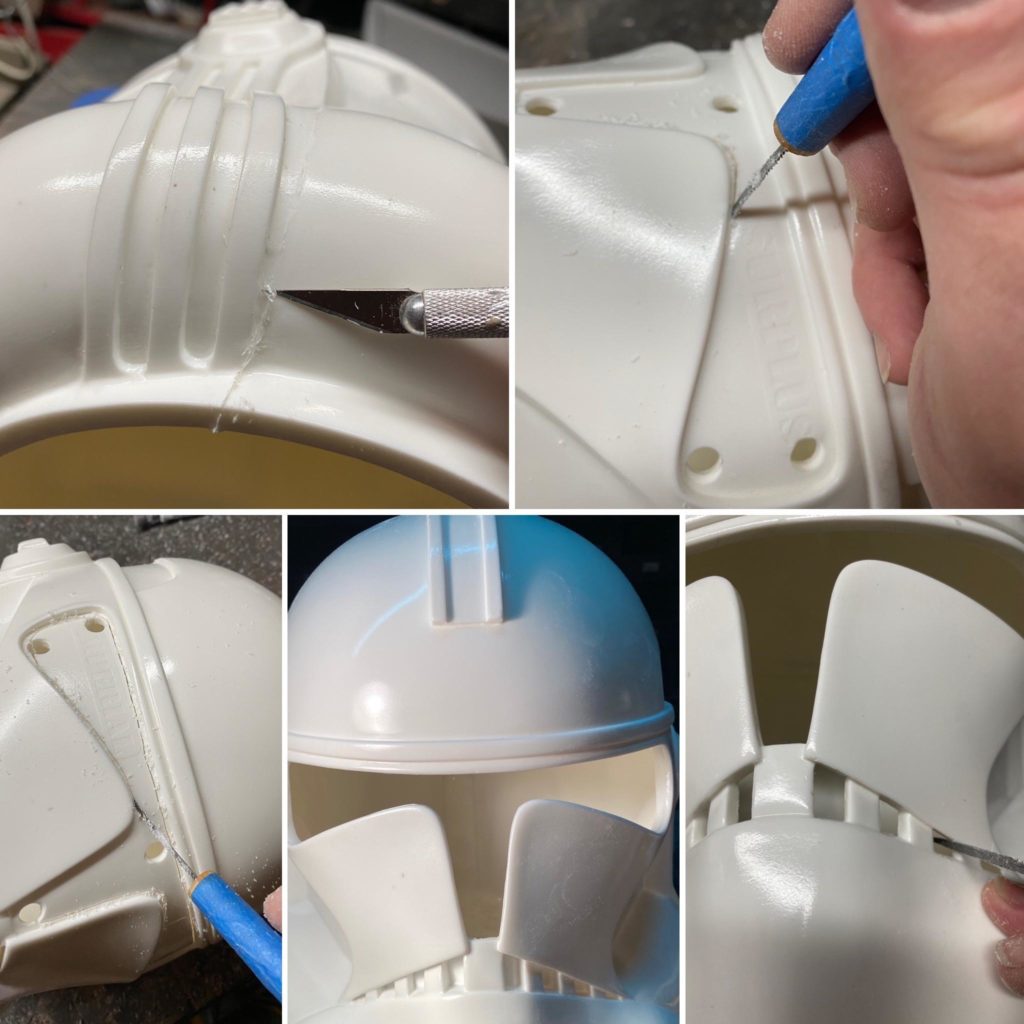
Because the visor and teeth are easier to remove from a solid helmet, cut those next. I took a small blade to clean up the minimal seam flashing, and then used a drill, that saw tool, Dremel sanding drum, and files to remove and clean up the openings. For the last small teeth, simply grind from the back until the hole is revealed:
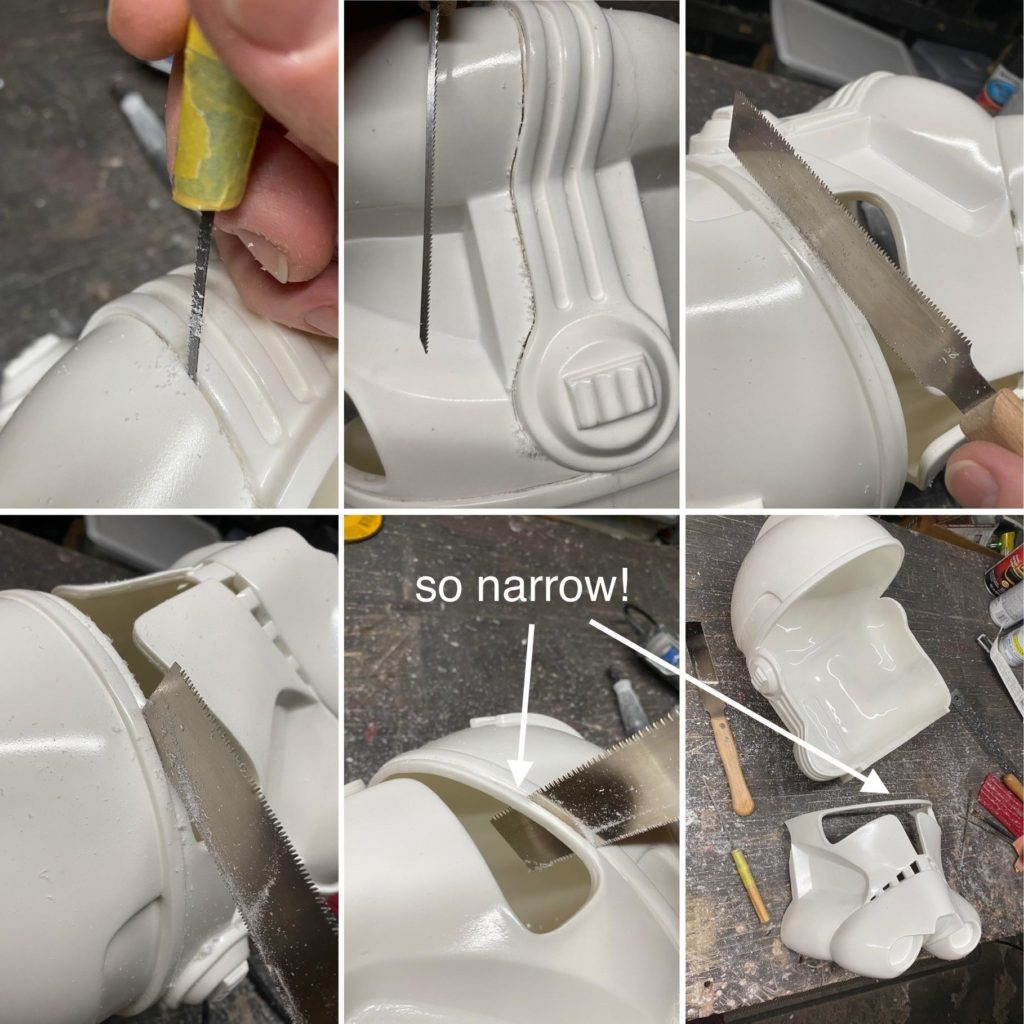
I used my little coping saw blade tool for the curved line around the ear line, and back over the top. For the straight cuts (across the brow on this mod is the only straight cut), I used an even thinner saw. It’s called a “flexible Japanese flush cut saw” (mine is the double edged one) which is used for cutting off pegs or other mortise and tenon joints. To cut the brow, I started slowly cutting in the center, and once the saw went through enough of the curve to fit the width through the gap, I could continue up and down. It does help to cut the whole length part way down from the outside as a guide before sawing to ensure a straight cut. Take it slowly. Seriously. Especially on the face-off mod, that top strip is so thin, and any slip or drift could make some repair work after. All told it took only about 30 minutes with hand tools, taking it slow and easy.
After building the helmet, this step now feels fairly optional. I was really worried about the strength of that thin strip above the visor hole, so I took a strip of leftover ABS plastic from trimming armor, and cut a strip that was wider on the ends, and fit behind that strip. I clamped and glued it with E6000 to give it even more flexibility, and clamped it overnight. I use the white Paintable E6000 for things where the seeping glue might require weathering or other paint to adhere to it. The reason I find it optional is that, while it kept that piece strong for all of the subsequent build steps, once I cut and glued in the visor, it was now fully reinforced by that visor, and as a finished prop, would not need that plastic strip. Still, I include it here for those who like over rather than under engineering:
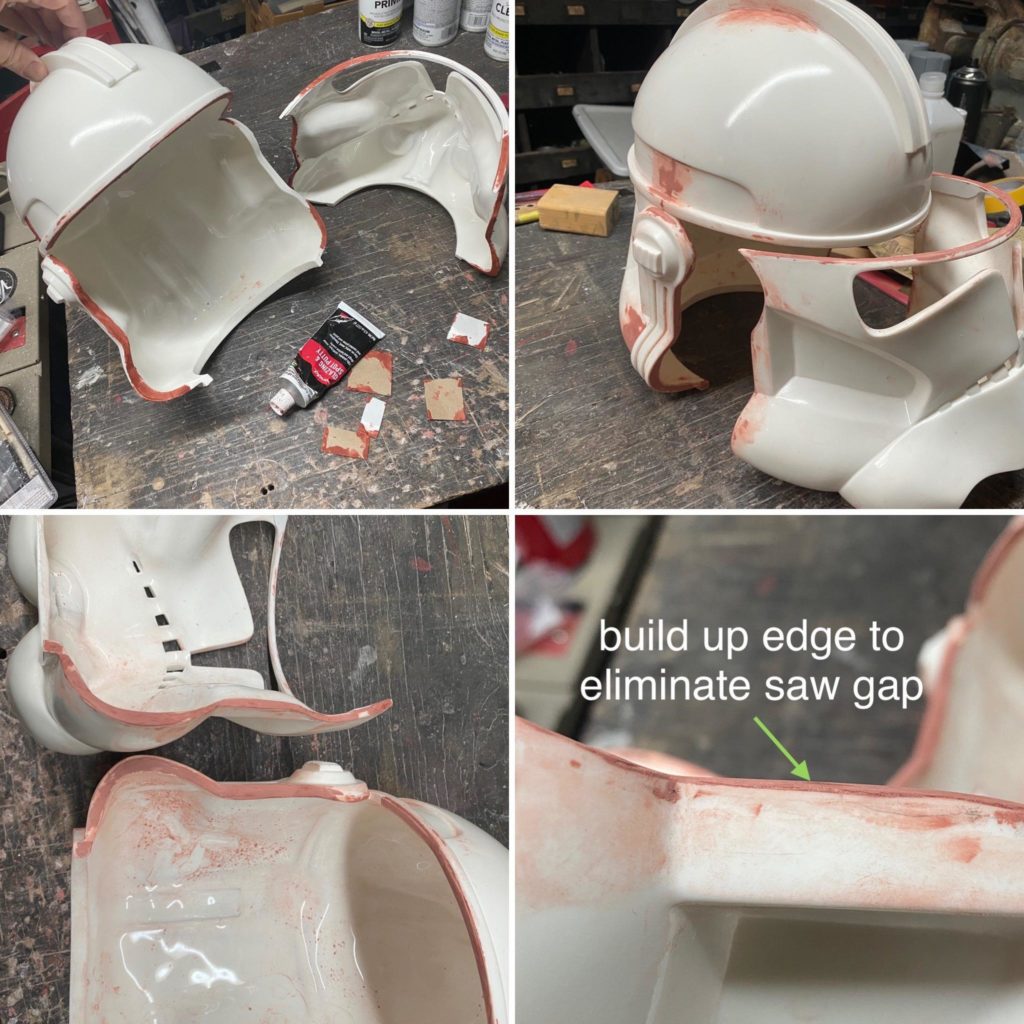
Next up, it is Bondo time! The cast itself had very few areas that required filling, mostly on the seam line above the “ears”, but the cut line requires a few passes with it. No matter how thin your blade is, there still is saw-dust removed, and that gap will be less noticeable the more you get that edge back to flush. I use the Bondo Glazing and Spot Putty tube, and apply it, let it dry, sand it flush, check the gap, mark any larger gaps with a pencil, and repeat. This took about three passes to get it up to mostly flush. It is not a perfectly flush seal, but so close that the weathering will cover any doubt that it is a solid helmet.
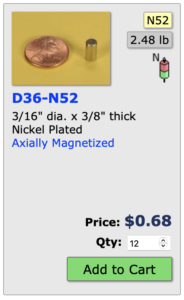
You will need fairly strong magnets for this mod to ensure the face stays put. My nightmare is that some strong jostle, or sudden head turn would make the face fall off during a troop or while handling the helmet. I opted for strong magnets, and the best source I have found for specific magnets is K&J Magnetics. They have hundreds of options, and ship usually in a day or two. The exact ones I used are below, but the thing to look for is strength, and Axially magnetized (magnetic through the length, rather than side to side). N-52 are about the strongest you can get, whereas most hardware and craft stores have N-42 or even in the 30s. These each will hold nearly 2.5 lbs (1.1 Kg) each, and we will be using 12 of them. Three on each side in the back, three on each side on the face.
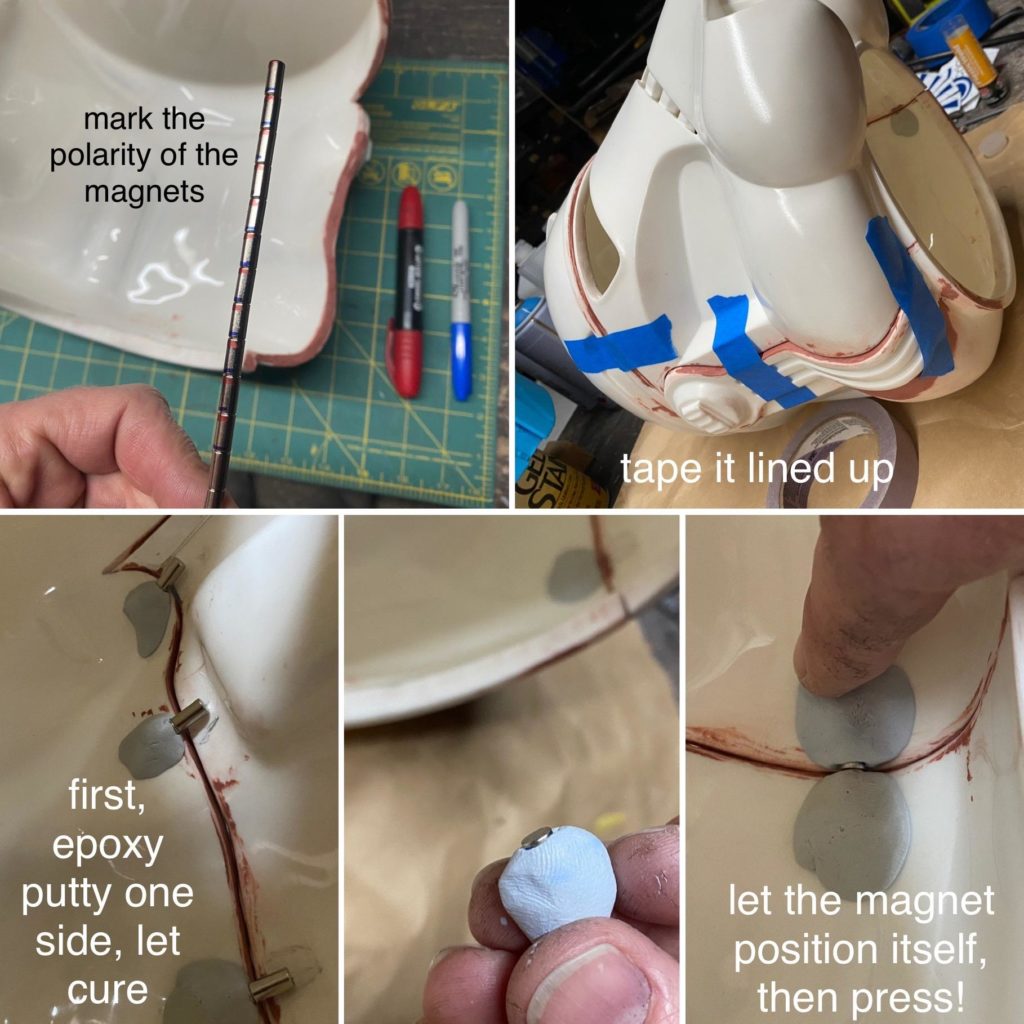
To mount the magnets, I taped the face on where it needed to rest, and marked three locations across the cut from the inside and then removed the tape. I then roughened the mounting points with coarse sandpaper. To ensure I had all magnets mounted correctly, I stacked them in a line and marked the ends with a blue and red sharpie. This means that for the back of the helmet, I would mount all magnets with the blue end showing, and the face with the red end showing. Trust me, you can keep track to a degree, but they you start mixing putty and glueing, and magnets get turned around. I used the JB plastic weld epoxy putty, but most would work in this case. It is a two part putty that you slice and mix, and you have about 6-10 minutes of working time. Because of this, I usually did three magnets per batch to avoid stress. Surround the magnets with putty except the end, and mount the magnet faces as close to the edge line as you can. For the three mounts, ensure they are “level” rather than angled in any way so that the face plate can detach and attach straight in and the opposing magnet will sit flush.
Important: it will be very difficult to precisely line up all six pairs to sit flush with each other if you do this all at once. Instead, mount the six magnets on the main helmet, and then allow it to cure for at least four hours before proceeding. Now that one side is all mounted, tape the face securely in place exactly where you want it to sit when complete. You can then allow the face magnets to slide into place, and show you where they want to be. If it looks good, take each one and surround them with putty, almost to the edge, and press into place once they meet their opposing mount.
The magnets work perfectly. The face snaps right into place, and is removable only if you grip the cheek indents, and pull straight out. The helmet is nice to put on and take off. Success!
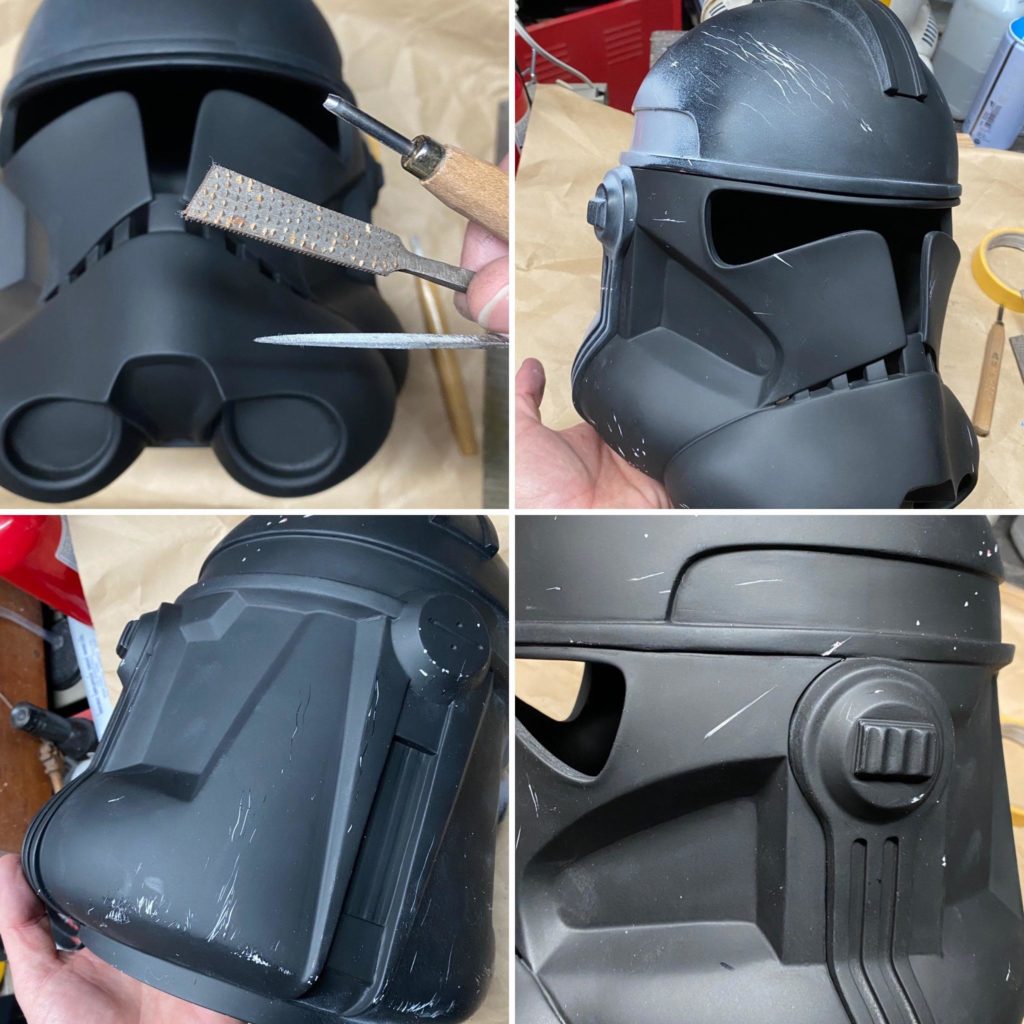
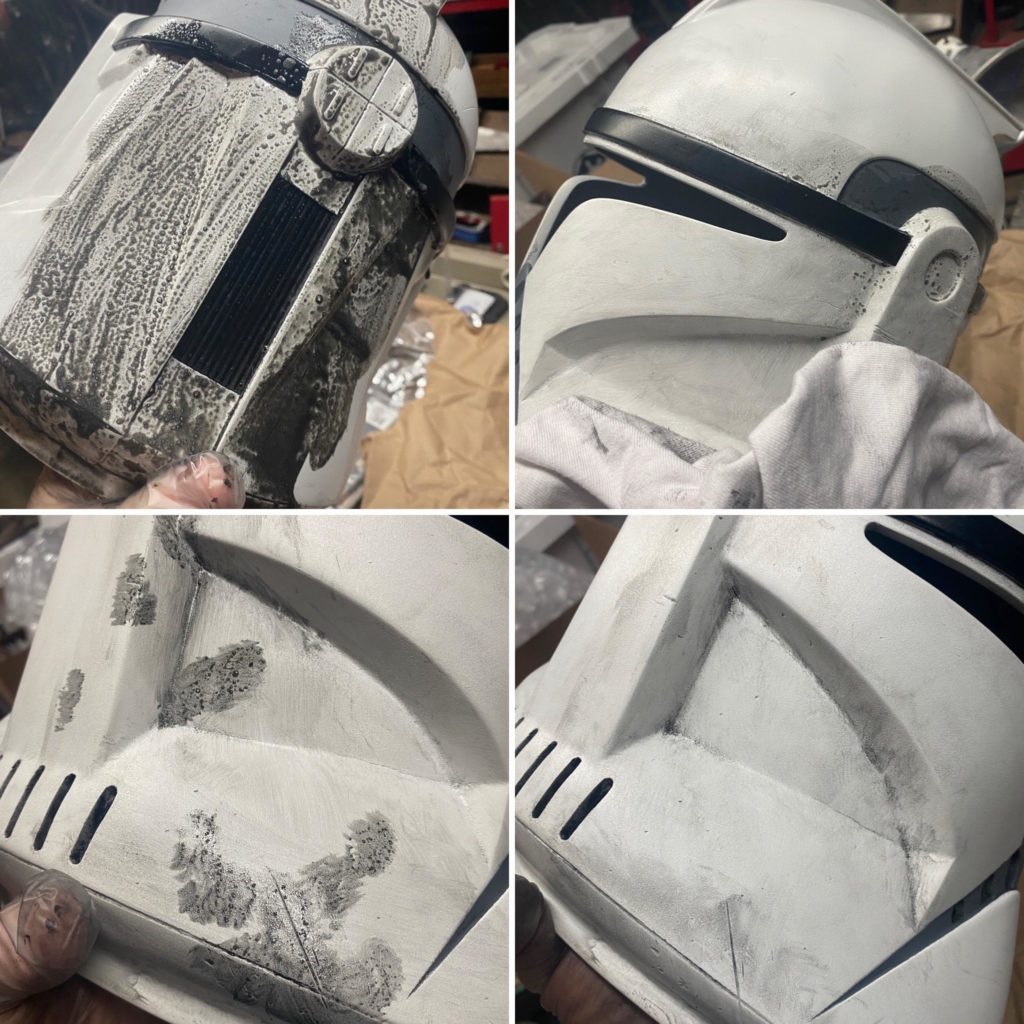
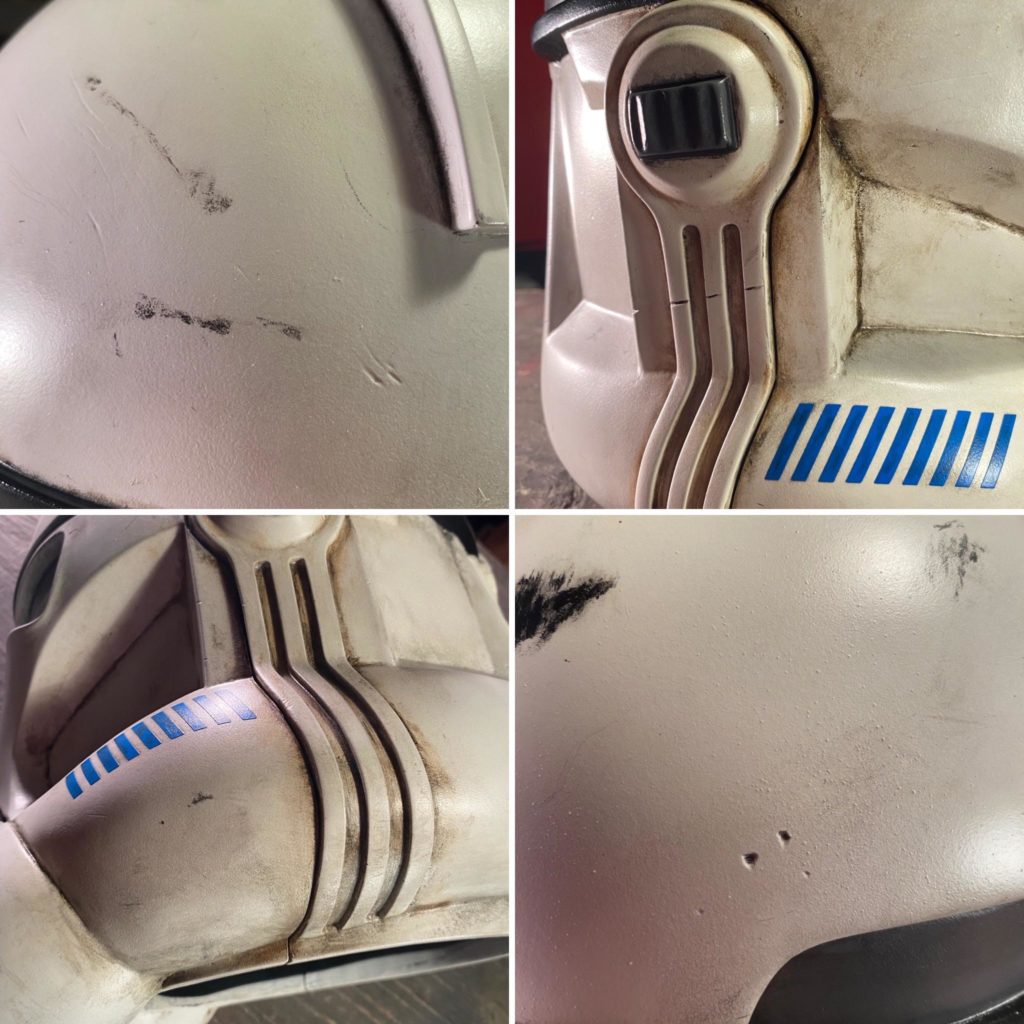
Now that the face is complete, I painted it all with some flat black primer to ensure that my Bondo looked good. I also painted the inside, and painted it with the face removed to ensure the seam edges were painted. I like to add “physical” weathering, which means using rasps, needle files, and small wood carving gouges to create dings and scratches that will catch and hold the weathering. These details also catch light in close ups, and really add to the realism of the weathering.
A note on weathering, either physical or painted: Try and imagine what is causing it. Strive for asymmetry, and areas of un-damaged spots to avoid a completely evenly battered helmet. For instance, I think of a blast on one side, and create dings and gouges from the shrapnel that would radiate from that blast. A scratch could hit the high points across a few parts, so use a long V-file to continue the line across from the cheek to the ears, or the brow to the crest. I often put a few scratches and dings on the back lower edge, from a trooper sliding back across a floor from a blast, or dropping his helmet after a long day. Avoid scratches in deep recesses, as those rarely get hit like the ridges. I see a lot of helmets that have ONLY 45 degree angle scratches or marks, like 20 of them. Some have to be 15 degrees, or even 90 degrees or 0 degrees. Make some more round divots, some long scratches, and some groups of rougher lines (from a rasp) that mimics scuffing along pavement. Vary it up.
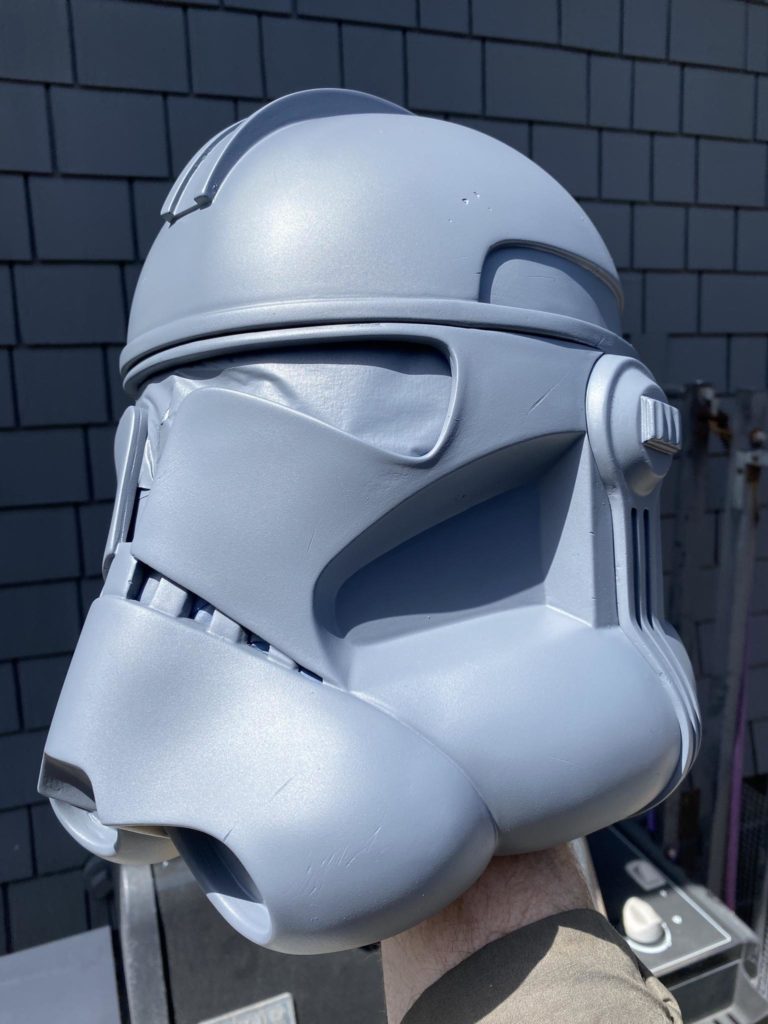
Next I taped the visor and teeth holes closed, and primed it with grey (Rustoleum gray primer). This is to both prime the new gouges, as well as paint the gray for the frown and brow and ear button grey areas. This also gives you a chance to see how everything looks before painting. It is okay at this time to fill and sand any physical weathering that went too far. I did fill a few small spots on this helmet that just had too much going on.
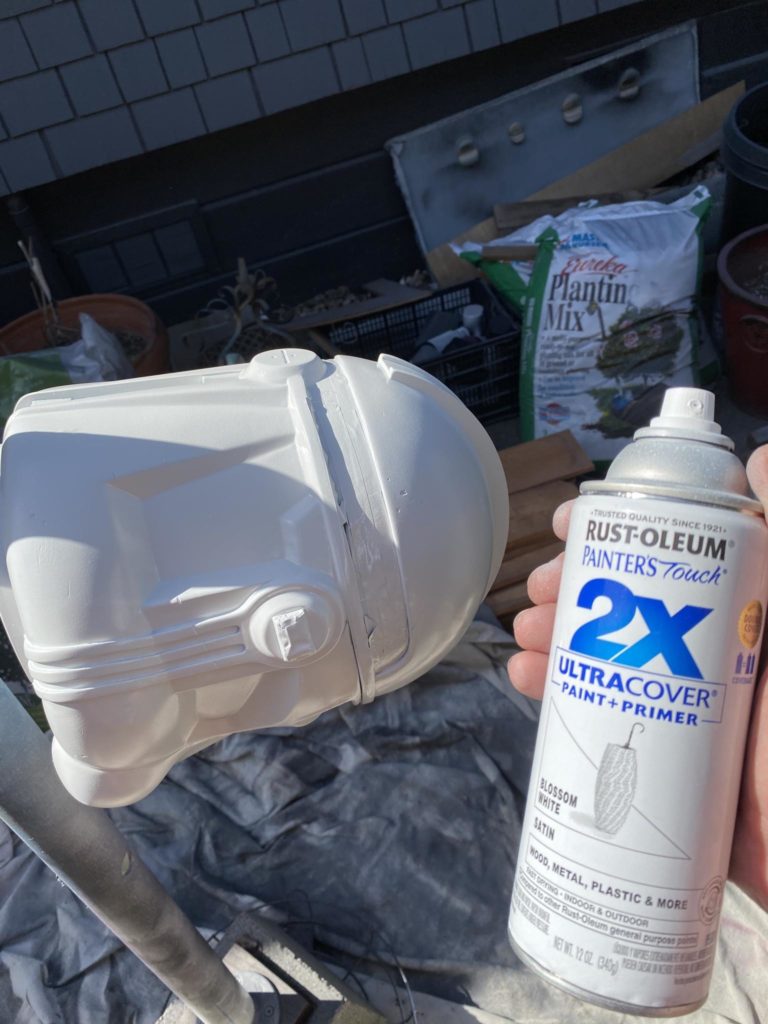
Next I taped the frown, ears, and back brow with tape (mostly taping down to a cutting mat and cutting long thin triangles for the frown, or curved pieces for the gray band to arch around the curves in the temples or over the round section on the back. A trick to help with any tape leaks is, once taped, spray one more time with the under color (in this case grey primer) so that any leaks will be filled with grey, and seal it before the white coat. Then some Rustoleum flat white. I use flat white for the base because I find it has a nicer surface that allows for better acrylic weathering later. In the end I will spray a satin clear coat, to give it the final surface.
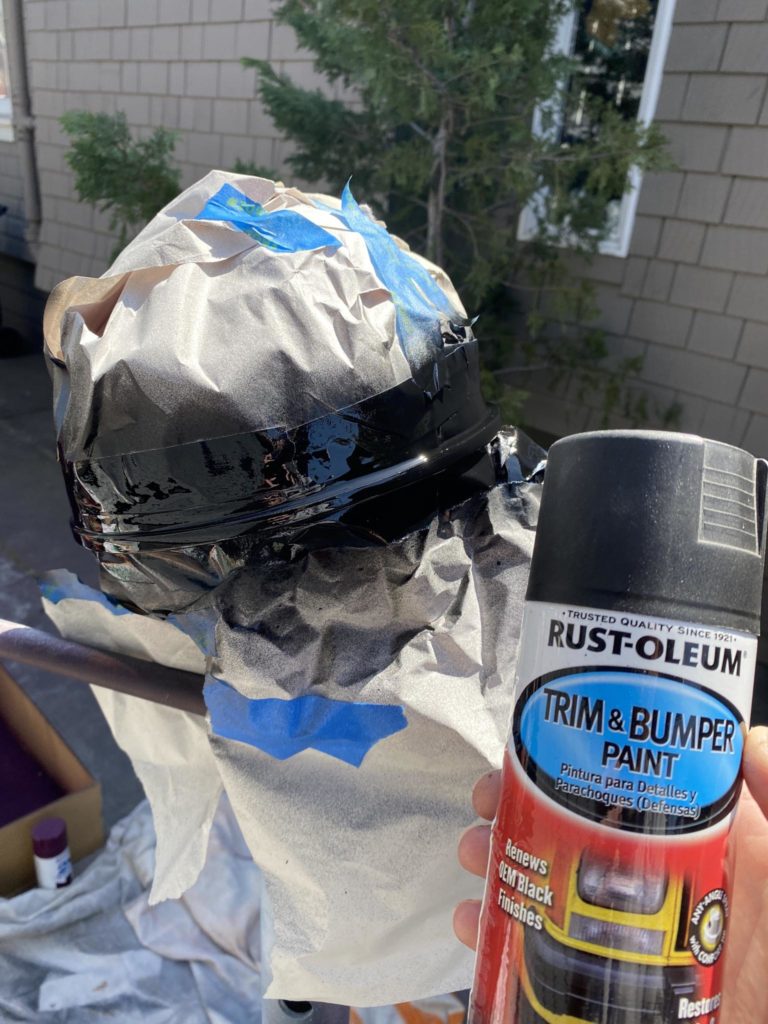
Next I tape off the brow stripe and the back vent section, and paint it with this bumper paint. Any more matte black would be fine here too, I just had it. I originally thought it would look more rubbery, but it really is not a huge effect:
The kit includes a vocoder and aerators, and I roughened the contact spots, and glued on with CA glue. I used different aerators on this build, but the process is the same.
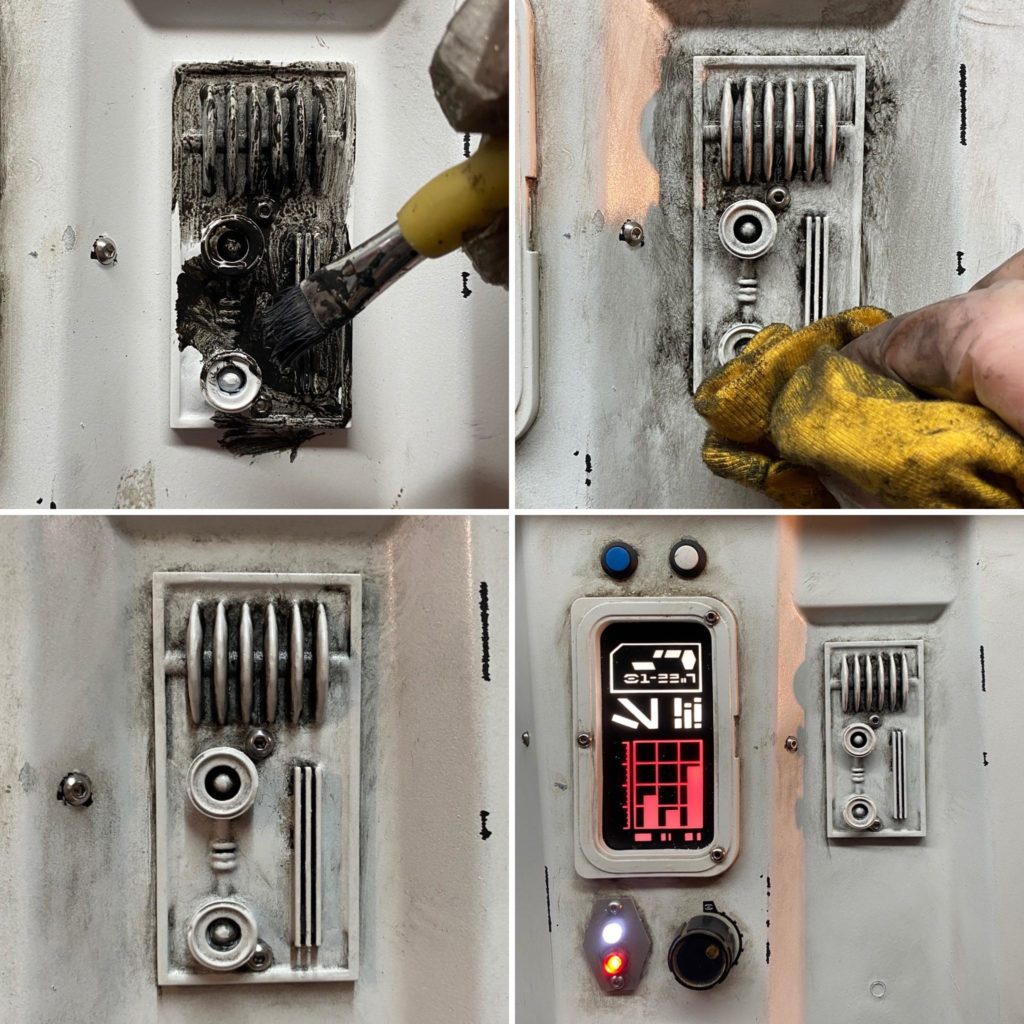
Next up was Paint Weathering. I have done this so many times, that I didn’t take pictures of it, but here is my process from some other props. First I set up an area with acrylic paints (Black, a little bit of Raw Umber, and a tiny bit of Burnt Sienna). I mix mostly black, a touch of brown, and and a lot of water to create a wash. I have two rags, one dry, and one wet. I scrub the paint all over with a ragged brush, and then wipe it off with the dry rag to give a sort of base grunge. I often use the wet rag to pull it off of the high points back to white, and then do it again, until it looks dull but not gray. Then I get thicker paint, and dab it and push it into the cracks, like the deep ear lines, the frown, and the cheek indents. Again, painted on, wiped off, painted on, dabbed off, back and forth about four times. I give really thick dabs in the gouges, and then wipe them off to leave some black in them. Because the RoTS helmets had a redder “rust” color around the ears, I used the Burnt Sienna to give it that look. Because this helmet has the face-off seam line, I spent extra care weathering that line to help disguise that seam. Here are some photos from those other props that were weathered in the same way:
Finally, because the troopers have a few distinctive black marks on their armor, I went in with some black acrylic and a ragged brush to create a few of those marks. Less is more. For inspiration, look at the visual guides to see how often they appear.
Next, I clear coated it with a satin clear coat, and let cure for at least a warm day, or a few cold days before the next part which will involve clamping on the surface.
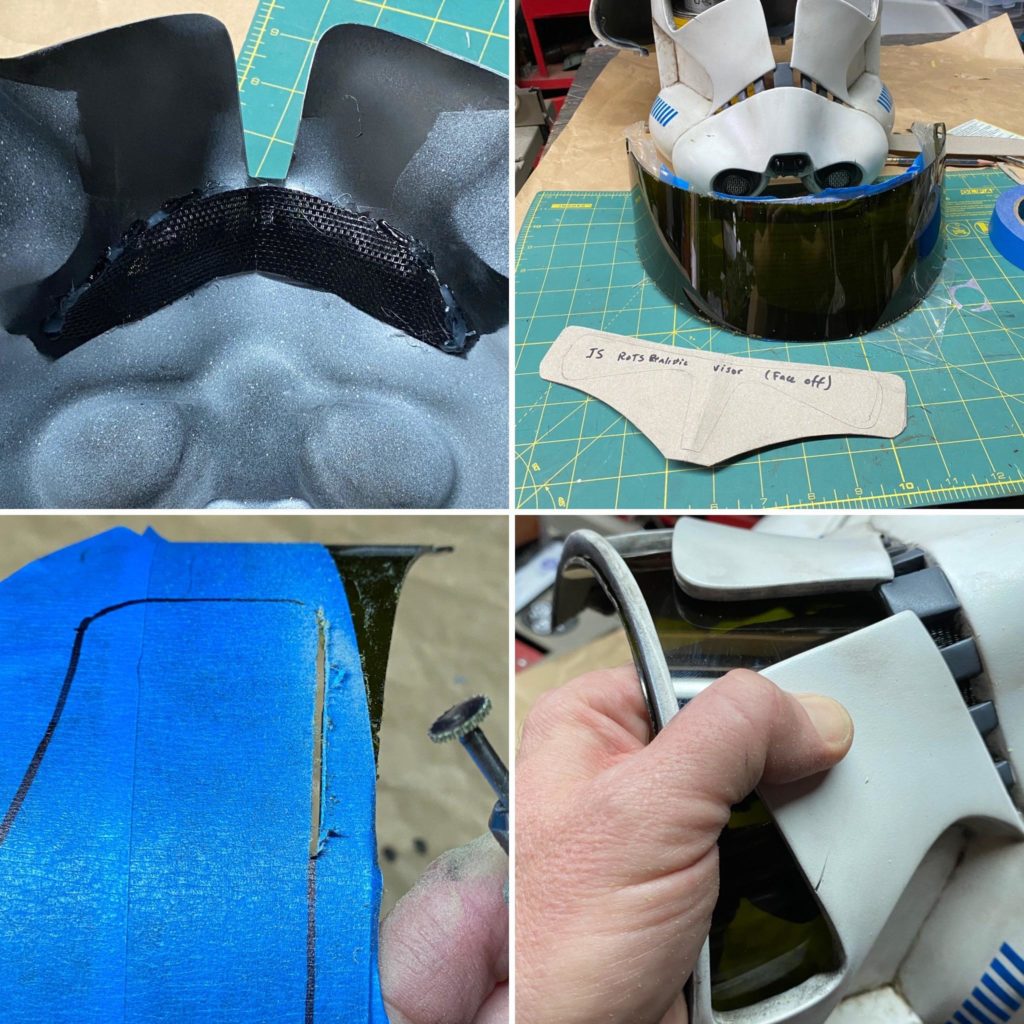
The helmet must be painted and clear coated before the visor and mesh can be installed.
The helmet comes with both mesh and visor included. For the mesh, I opted for the denser Phifertex Plus mesh that has two vertical strands to each horizontal, because I wanted it to match my other clone helmets. I glued the mesh in with hot glue.
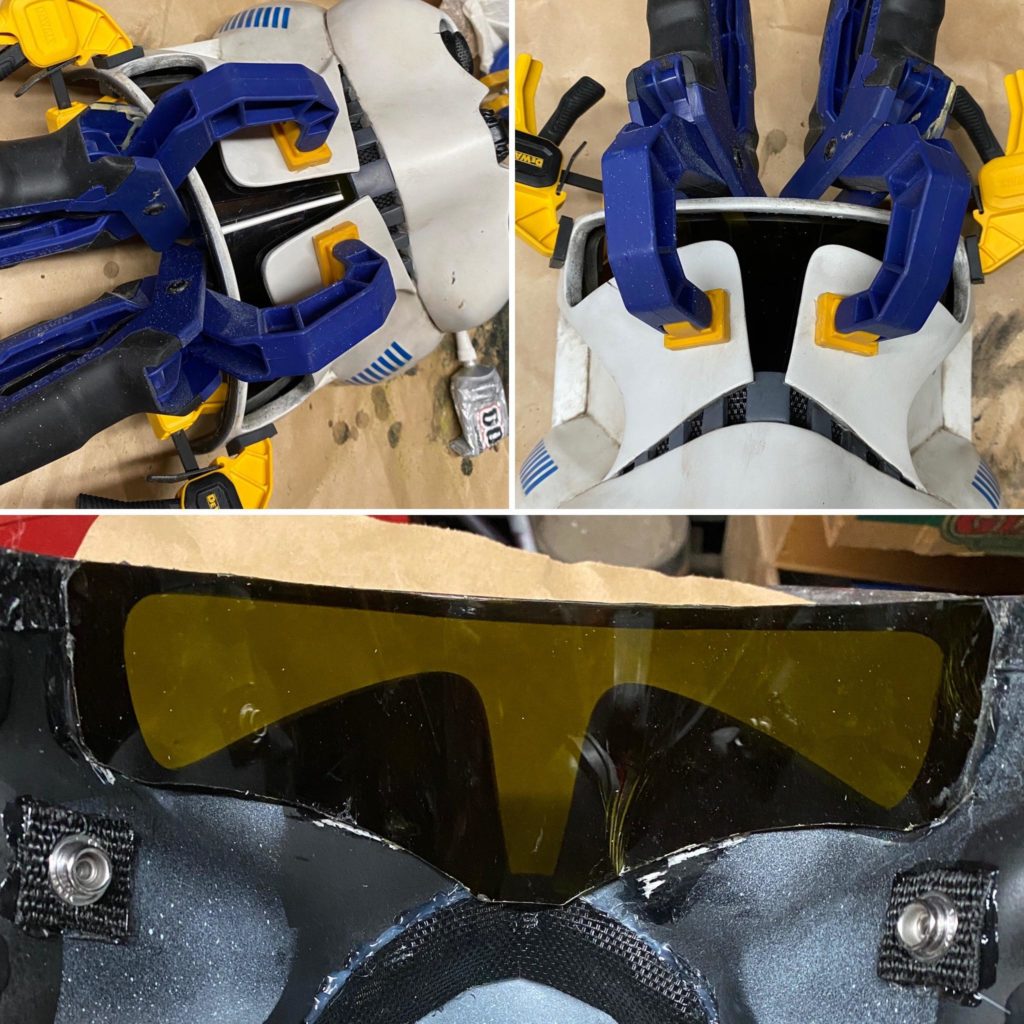
I usually clip in and velcro my visor to be removable, but in this case with the face-off mod, the visor must be mounted with only a thin overlap on top. I realized if it were glued, it would further strengthen that strip. For visors, you should not use CA glue, as it permanently fogs any clear materials. I used clear CA glue for this, which would also add some flexibility to the bond. A really nice part of this kit is that Imperial Surplus provides a thicker curved visor piece to use. This makes it stronger and it wants to be in this shape. I used a piece of cereal box cardboard to cut my template, and then taped the visor to draw and cut my line, using a small cutting bit in a Dremel. I gently sanded the edges, and checked the fit:
Next, I applied the minimum amount of E6000 glue along the top edge, and the sides and below the visor (to avoid any squeezing out), and clamped it in place overnight. You can see how the visor covers part of the mesh, so that is why I did the mesh first:
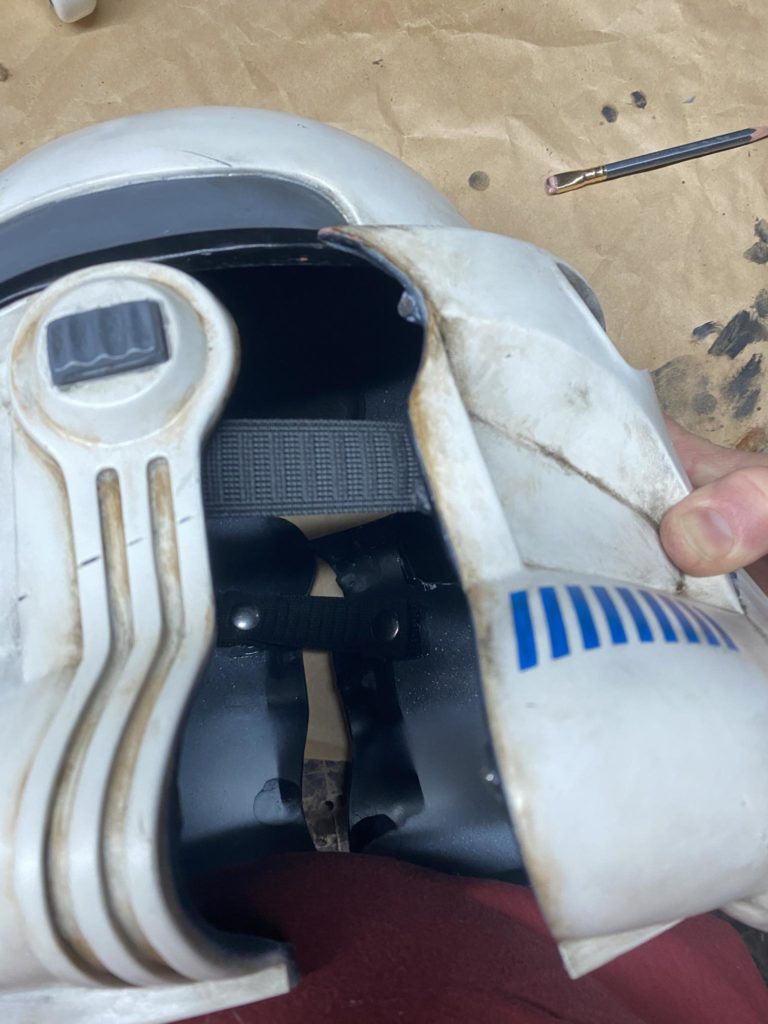
You may notice in that last interior photo, there are some snaps. As a failsafe, I decided to glue male snaps mounted to 1″ square webbing to the face and helmet on both sides. I then cut two strips elastic and mounted female snaps in both ends. This gives me the option of snapping an elastic strap on one or both sides. I would use this for having a helmet out at a con for people to handle, to ensure it stays mounted, or use just one side while trooping as a fail-safe in the event it somehow gets dislodged. Here is what it looks like stretched open:
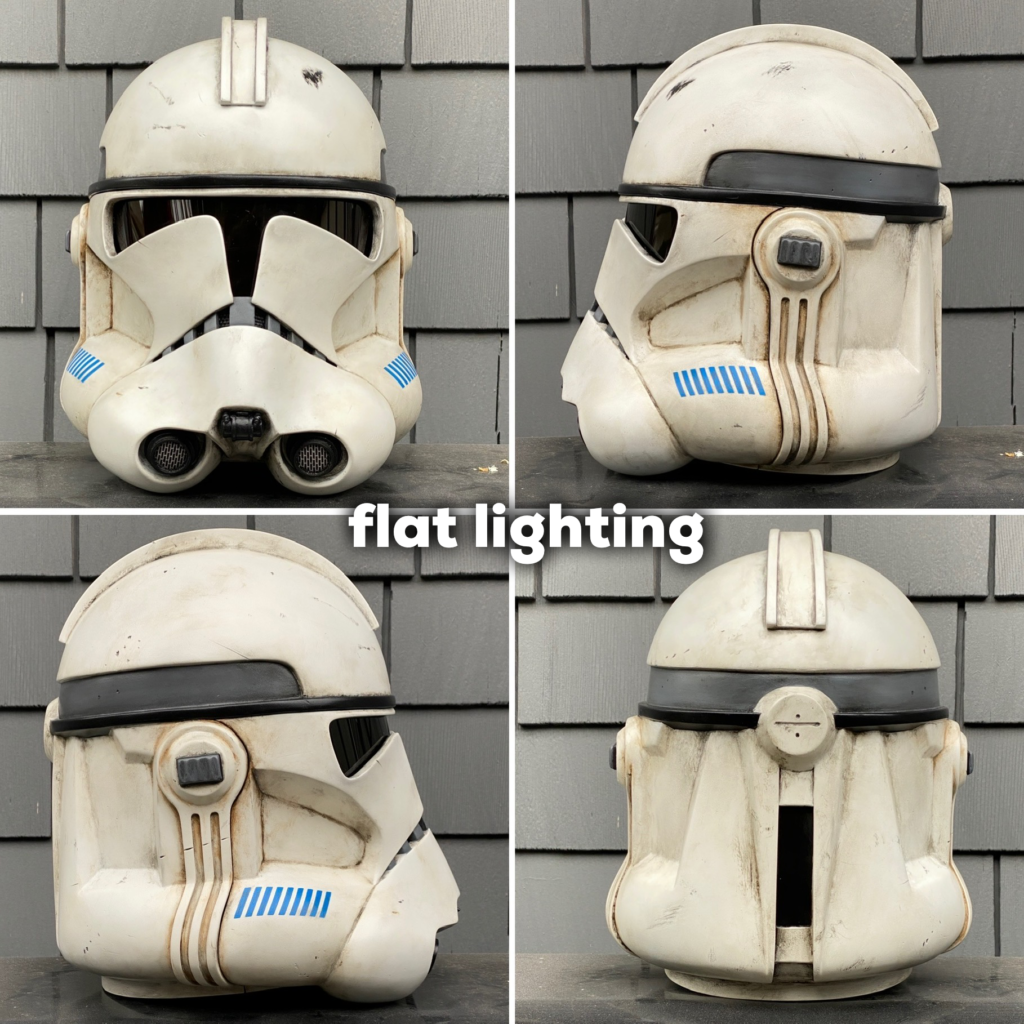
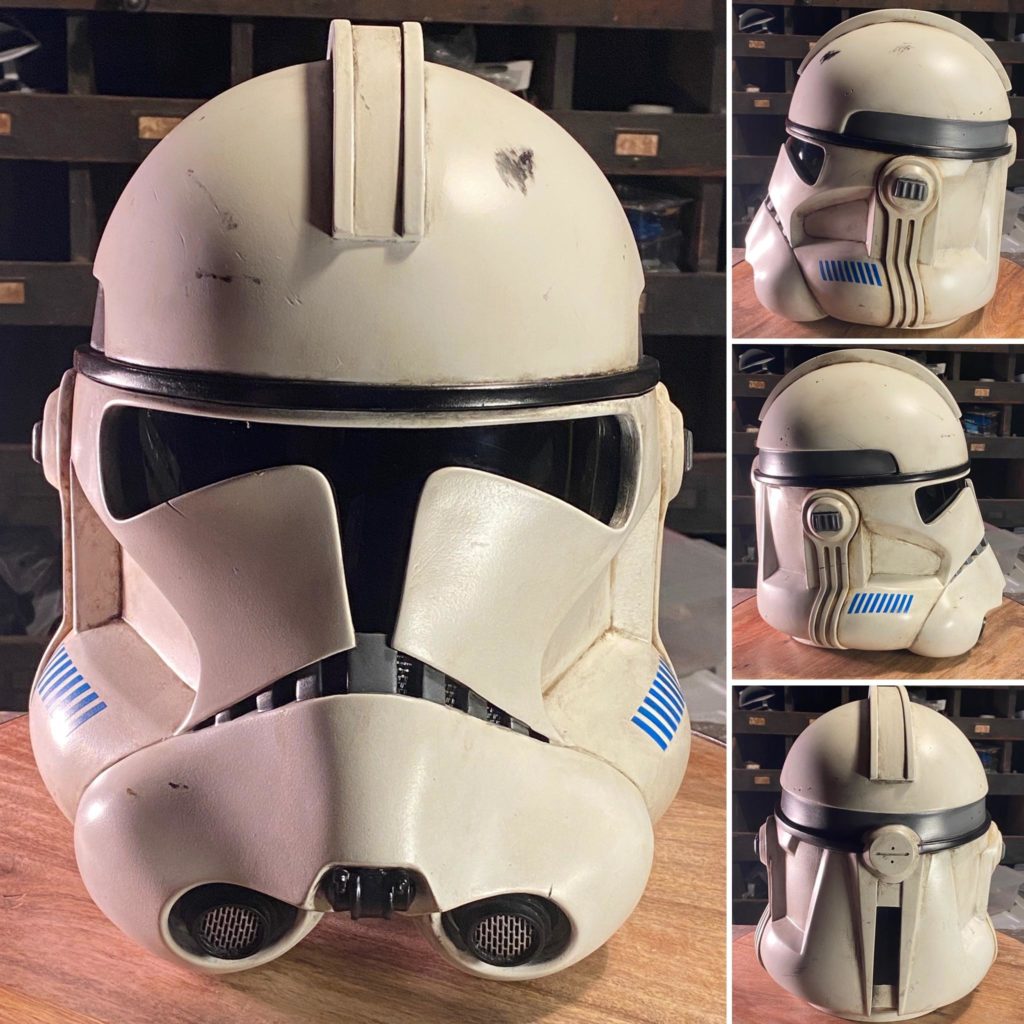
The helmet is finished! Here are some photos, and two turnaround videos. One with it connected, and one with the face detached. When the helmet rotates you can see how the “physical weathering” marks show as the shine passes over them like a real object would: